Skip to content
English
On this page

AWS CodeCommit

AWS CodeCommit is a fully managed source control service that makes it easy for companies to host secure and highly scalable private Git repositories. AWS CodeCommit eliminates the need to operate your own source control system or worry about scaling its infrastructure. You can use AWS CodeCommit to store anything securely, from source code to binaries, and it works seamlessly with your existing Git tools.

What Is AWS CodeCommit?

Before any activities can occur to deploy applications, you must fi rst have a location where you can store and version application code in a reliable fashion. AWS CodeCommit is a cloud-based, highly available, and redundant version control service. AWS CodeCommit leverages the Git framework, and it is fully compatible with existing tooling. There are a number of benefits to this service, such as the following:

  • Automatic encryption in-transit and at rest.
  • Scaling to handle rapid release cycles and large repositories.
  • Access control to the repository using IAM users, IAM roles, and IAM policies.
  • Hypertext Transfer Protocol Secure (HTTPS) and Secure Shell (SSH) connectivity.

However, the biggest benefi t of AWS CodeCommit is built-in integration with multiple other AWS services, like AWS CodePipeline. With these integrations, AWS CodeCommit acts as the initial step to automate application code releases.

AWS CodeCommit Concepts

This section details the concepts behind AWS CodeCommit.

Credentials

When you interact with AWS, you specify your AWS security credentials to verify who you are and whether you have permission to access the resources that you request. AWS uses the security credentials to authenticate and authorize your requests.

HTTPS

HTTPS connectivity to a Git-based repository requires a username and password, which pass to the repository as part of a request. To use AWS CodeCommit with HTTPS credentials, you must fi rst add them to an IAM user with suffi cient permissions to interact with the repository. To create Git credentials for your IAM user, you open the IAM console, and select the user who will need to authenticate to the AWS CodeCommit repository via HTTPS. AWS generates security credentials for the usernames and passwords, and they cannot be set to custom values.

Make sure to download or copy the credentials because the password will be lost after you close the success window.

After you confi gure your Git CLI/application to use the repository’s HTTPS endpoint and the username/password, you will have access to the AWS CodeCommit repository.

SSH

With SSH authentication, there is no need to install the AWS CLI to connect to your repository. However, you perform some additional confi guration tasks.

  • Your IAM user must have the ability to manage their own SSH keys. To accomplish this, you add the IAMUserSSHKeys managed policy to the account.
  • Scaling to handle rapid release cycles and large repositories.
  • For Windows users, install a bash emulator, such as Git Bash.

To confi gure SSH authentication to AWS CodeCommit repositories, follow these steps:

  1. In the IAM console, select the user account you want to modify.
  2. Upload the public SSH key on the Security Credentials tab.
  3. Copy the SSH key identity (ID). This follows the form APKAEIGHANK3EXAMPLE.
  4. Update the ~/.ssh/config file on your workstation to include these contents:
Host git-codecommit.*.amazonaws.com
 User YOUR_SSH_KEY_ID
 IdentityFile YOUR_PRIVATE_KEY_FILE
  1. To verify the configuration, test a simple SSH connection to the AWS CodeCommit endpoint, as shown here:
# Format: ssh git-codecommit.[REGION_CODE].amazonaws.com
 ssh git-codecommit.us-east-1.amazonaws.com

Use the Credential Helper

The previous HTTPS and SSH authentication methods both rely on additional credentials aside from IAM access/secret keys. It is also possible to authenticate to AWS CodeCommit with IAM credentials and the AWS CodeCommit credential helper . The credential helper translates IAM credentials to those that AWS CodeCommit can use to perform Git actions, such as to clone a repository or merge a pull request. To confi gure the credential helper on your workstation, do the following:

  1. Install and configure the AWS CLI.
  2. Install Git.
  3. Configure Git to leverage the credential helper from the AWS CLI with these commands:
git config --global \
 credential.helper '!aws codecommit credential-helper $@'
 git config --global credential.UseHttpPath true

Once complete, HTTPS interactions with the AWS CodeCommit repository should work as expected.

The credential helper authentication method is the only one available for root and federated IAM Users.

Development Tools and Integrated Development Environment

AWS CodeCommit integrates automatically with any development tools that support IAM credentials. Additionally, after you set up HTTPS Git credentials, you are able to use any tools that support this authentication mechanism instead. Examples of supported integrated development environment (IDE) include the following:

  • AWS Cloud9
  • Eclipse
  • IntelliJ
  • Visual Studio

Repository

A repository (repo) is the foundation of AWS CodeCommit. This is the location where you store source code fi les, track revisions, and merge contributions (commits). When you create a repository, it will contain an empty master branch by default. To confi gure additional branches and commit code changes, you connect the repository to a local workstation where changes can be made before you upload or push them.

Repository names must be unique within an individual AWS account; however, you can change them without re-creating the repository. When you change a repository name, you need to update any local copies of the repository to have their remote point to the new HTTPS or SSH URL with the git remote add command.

Repository Notifications

AWS CodeCommit supports triggers via Amazon SNS, which you can use to leverage other AWS services for post-commit actions, such as fi ring a webhook with AWS Lambda after a commit is pushed to a development branch. To implement this, AWS CodeCommit uses AWS CloudWatch Events. You create event rules that trigger for each of the event types that you select in AWS CodeCommit. Event types that will fi re notifi cations include the following:

  • Pull Request Update Events
  • Create a Pull Request
  • Close a Pull Request
  • Update Code in a Pull Request
  • Title or Description Changes
  • Pull Request Comment Events
  • Commit Comment Events
  • Comments on Code Changes
  • Comments on Files in a Commit
  • Comments on the Commit Itself

If you change the name of the repository through the AWS CLI or SDK, the notifications cease to function. (This behavior is not present when you change names in the AWS Management Console.) To restore lost notifications, delete the settings and configure them a second time.

Repository Triggers

Repository triggers are not the same as notifications, as the events that fire each differ greatly. Use repository triggers to send notifications to Amazon SNS or AWS Lambda during these events:

  • Push to Existing Branch
  • Create a Branch or Tag
  • Delete a Branch or Tag

Triggers are similar in functionality to webhooks used by other Git providers, like GitHub. You can use triggers to perform automated tasks such as to start external builds, to notify administrators of code pushes, or to perform unit tests. There are some restrictions on how to configure triggers.

  • The trigger destination, Amazon SNS or AWS Lambda, must exist in the same AWS region as the repository.
  • If the destination is Amazon SNS in another AWS account, the Amazon SNS topic must have a policy that allows notifications from the account that contains the repository.

Cross-Account Access to a Different Account

In some situations, the repository that contains the application source code may be located in a separate AWS account from the IAM user/role attempting to access it. In these situations, there are several steps that you must perform in the repository account and the user account.

Repository Account Actions

  1. Create a policy for access to the repository. This policy should allow users in the user account to access one or more specific repositories, as well as (optionally) to view a list of all repositories.
  2. Attach this policy to a role in the same account, and allow users in the user account to assume this role.

User Account Actions

  1. Create an IAM user or IAM group. This user or group will be able to access the repository after the next step.
  2. Assign a policy to the user or group that allows them to assume the role created in the repository account as part of the previous steps.

Once these steps are complete, the IAM user will first need to assume the cross-account role before you attempt to clone or otherwise access the repository. You adjust the AWS credentials file ~/.aws/config (Linux/macOS) or drive:\Users\username\.aws\config (Windows). A profile will be added to this config file that specifies the cross-account role to assume.

[profile MyCrossAccountProfile]
region = US East (Ohio)
role_arn=arn:aws:iam:111122223333:role/MyCrossAccountContributorRole
source_profile=default

Lastly, you need to modify the AWS CLI credential helper so that you use MyCrossAccountProfile.

git config --global credential.helper \
 '!aws codecommit credential-helper --profile MyCrossAccountProfile $@'

From this point, the IAM user in the user account will be able to clone and interact with the repository in the repository account.

Files

A file is a piece of data that is subject to version control by AWS CodeCommit. AWS CodeCommit tracks any modifications made to this file on a per-line level. You use the Git client to push changes in a file to the repository, where it tracks against other changes in previous commits.

Pull Requests

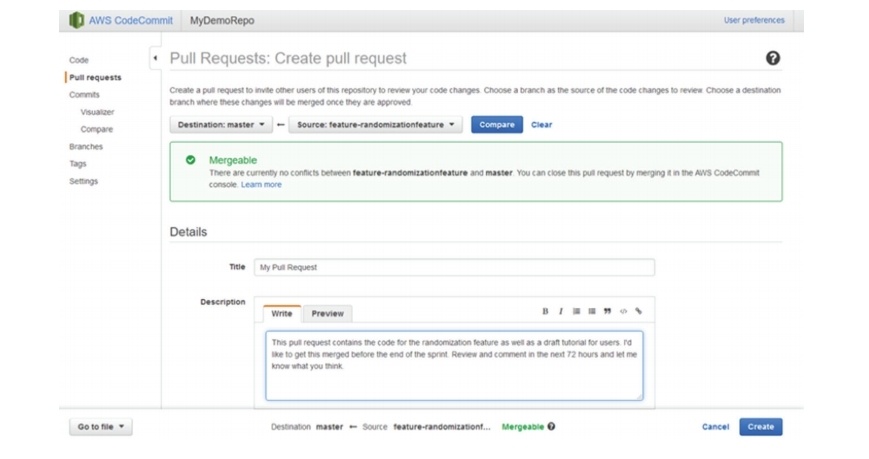
Pull requests are the primary vehicle on which you review and merge code changes between branches. Unlike branch merging, pull requests allow multiple users to comment on changes before they merge with the destination branch. The typical workflow of a pull request is as follows:

  1. Create a new branch off the default branch for the feature or bug fix.
  2. Make changes to the branch files, commit, and push to the remote repository.
  3. Create a pull request for the changes to integrate them with the default branch.
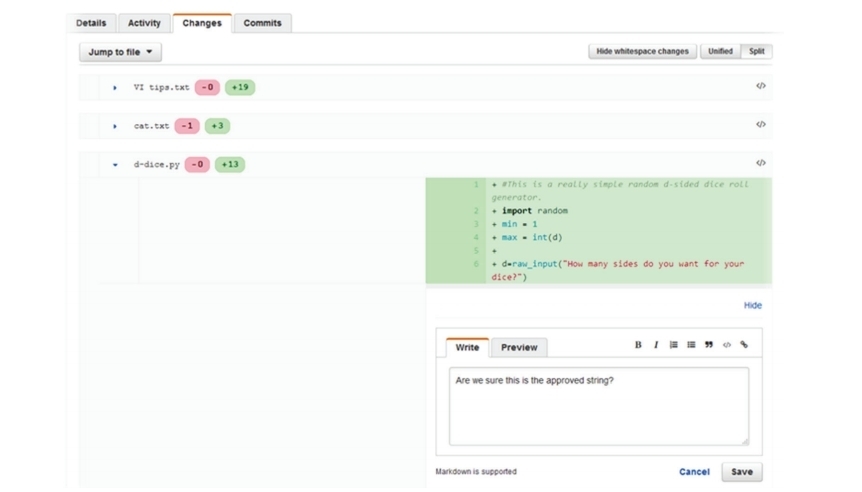
  4. Other users can review the changes in the pull request and provide comments.
  5. You can push any additional changes from user feedback to the same branch to include them in the pull request.
  6. Once all reviewers provide approval, the pull request merges into the default branch and closes. You can close pull requests when you merge the branches locally or when you close the request via the AWS CodeCommit console or the AWS CLI.

Creating a pull request

PullRequest

Reviewing changes

review changes

Commits

Commits are point-in-time changes to contents of files in a repository. A commit is not a new copy of the file, but it is instead a way to track changes in the line(s) in a file, by whom, and when. When you push a commit to the repository, AWS CodeCommit tracks the following file changes:

  • Author Name
  • Author Email
  • Commit Message

Commits to a repository in AWS CodeCommit can be made in one of two ways. The most common workflow is to use the Git CLI and update the repository using git push. The AWS CLI supports the aws codecommit put-file action, which allows you to update a file on the repository with a local copy and specify a branch, parent commit, and message.

aws codecommit put-file --repository-name MyDemoRepo \
 --branch-name feature-branch \
 --file-content file://MyDirectory/ExampleFile.txt \
 --file-path /solutions/ExampleFile.txt \
 --parent-commit-id 11112222EXAMPLE \
 --name "Developer" \
 --email developer@myexamplesite.com \
 --commit-message "Fixed a bug”

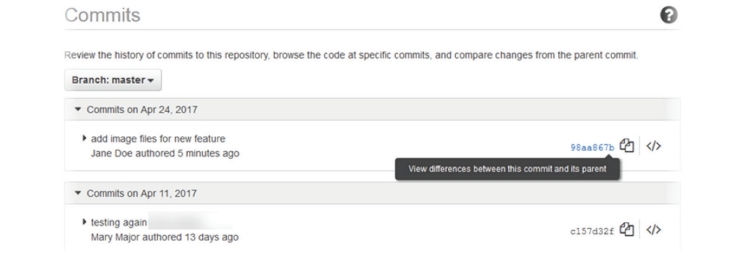
The AWS CodeCommit console supports viewing differences between commits. To view differences between a commit and its parent, open the Commits pane on the repository dashboard and then select the commit ID

Selecting the commit ID

commit_id

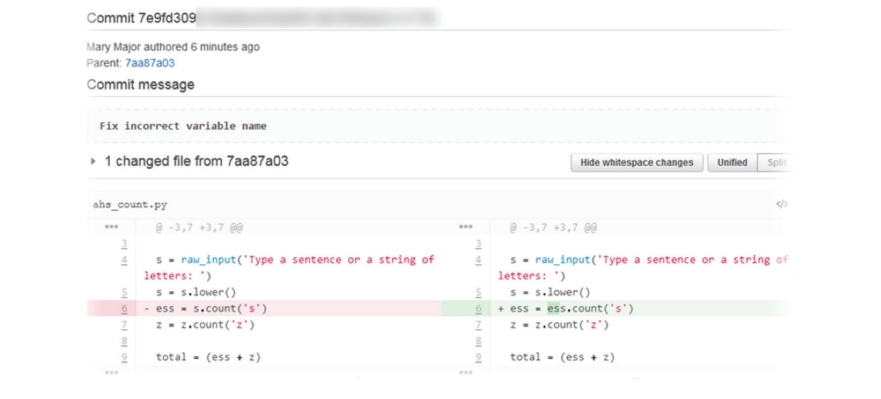
After doing so, you can view changes in this commit either side by side (Split view) or in the same pane (Unified view)

Split view

Split View

You can also view differences between arbitrary commit IDs in the same repository. In the Compare window of the repository dashboard, you can choose two commit IDs for comparison.

Select and compare

Compare

After you select two commit IDs, click the Compare button. This will provide a similar split or unified view of changes.

Branches

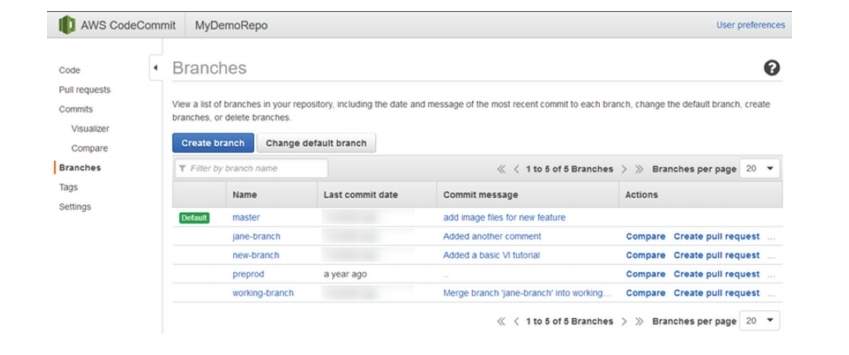
Branches are ways to separate and organize groups of commits. This allows developers to organize work in a meaningful fashion, separating changes into logical groups based on the feature or bug-fi x being developed. For example, a single repository may have branches for each environment: dev, test, and prod. Or, individual features and bug fi xes can have separate branches.

Braanch

A default branch is the base when you clone the repository. When you clone a repository to your local machine, the default branch (such as “master” or “prod”) clones. You cannot delete the default branch until a new branch is set as default, or you will delete the entire repository.

You can change the default branch for a repository, but first the new default branch must exist in the remote repository.

Migrate to AWS CodeCommit

This section details how to migrate a Git repository, unversioned fi les, or another repository type, and it is important when you migrate a high volume of or large files.

Migrate a Git Repository

You use an AWS CodeCommit to migrate from a Git repository.

Migrating

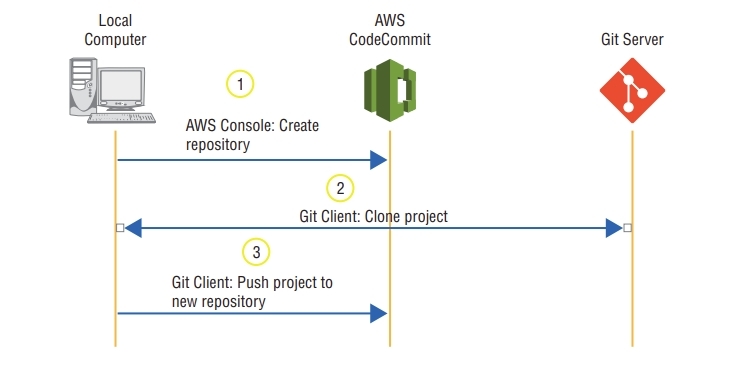
The first step is to create the AWS CodeCommit repository (via either the AWS Management Console or the AWS CLI or AWS SDK). After you create the repository, clone the project to a local workstation. To push this repository to AWS CodeCommit, set the repository’s remote to the AWS CodeCommit repository’s HTTPS or SSH URL.

git push \
 https://git-codecommit.us-east-2.amazonaws.com/v1/repos/MyClonedRepository \
 --all

If you need to push any tags to the new repository, run the following code:

git push \
 https://git-codecommit.us-east-2.amazonaws.com/v1/repos/MyClonedRepository \
 --tags

Migrate Unversioned Content

You can migrate any local or unversioned content to AWS CodeCommit in a similar manner, as if the content exists in another Git-based repository service. The primary difference is that you set up a new repository instead of cloning an existing one to migrate.

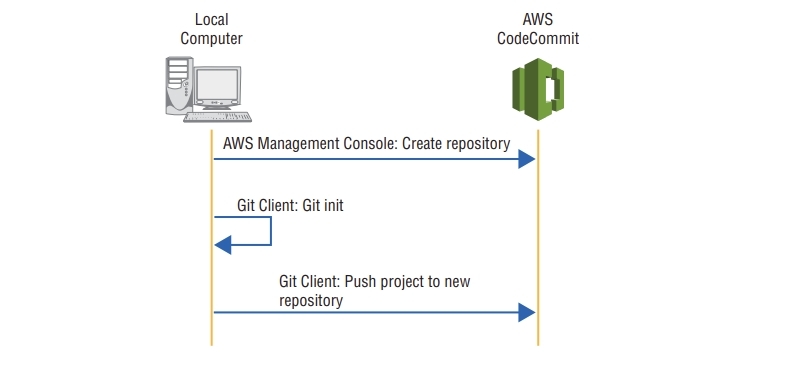
First create the AWS CodeCommit repository (either via the AWS Management Console or via the AWS CLI or AWS SDK). Next, create a local directory with the files to migrate, and run git init from the command line or terminal in that directory. This will initialize the directory to work with Git so that any file changes are tracked. After the directory initializes, run git add . to add all current files to Git. Run git commit -m 'Initial Commit' to generate a commit. Lastly, push the commit to AWS CodeCommit with git push https://git-codecommit.us-east-2.amazonaws.com/v1/repos/MyFirstRepo --all.

Migrating

Migrate Incrementally

For large repositories, you can migrate in incremental steps and push many smaller files. This prevents any network issues that may cause the entire push to fail. If any smaller commit fails, it is a trivial matter to restart it when you compare it to a single, monolithic commit.

Additionally, when you push large repositories, AWS recommends that you use SSH over HTTPS, as there is a chance that the HTTPS connection may terminate because of various network or firewall issues.

AWS CodeCommit Service Limits

AWS CodeCommit enforces the service limits in Table. An asterisk (*) indicates limits that require you to submit a request to AWS Support to increase the limits.

Limitvalue
Repositories per account*1,000
References per push 4,000
Triggers per repository10
Git blob size2 GB

Using AWS CodeCommit with AWS CodePipeline

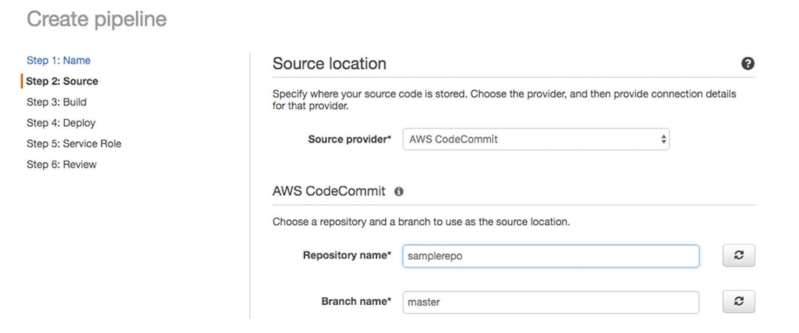
You can use AWS CodeCommit as a source action in your pipeline. This allows you to utilize a highly available, redundant version control system as the initialization point of your CI/CD pipeline. When you select AWS CodeCommit as the source provider, you must provide a repository name and branch. If you use AWS CodeCommit, it creates an Amazon CloudWatch Events rule and an IAM role to monitor the repository and branch for changes.

Source location

location

One issue that can arise is if you store large binary files. Because of the system Git uses to track file changes, Git creates a new copy of every modification to a binary file within the repository. Over time, this can cause repositories to grow rapidly in size. Instead of storing binary files in AWS CodeCommit, add an additional Amazon S3 source action to the pipeline. If you store large binary files in Amazon S3, you can reduce the overall cost and development time because of the reduction of time it takes to push/pull commits. Since Amazon S3 already supports versioning (and requires it for use with AWS CodePipeline), changes to binary objects will still be tracked so that rollbacks are straightforward.