Skip to content
English
On this page

Using AWS CodePipeline to Automate Deployments

AWS CodePipeline is a continuous integration and continuous delivery service for fast and reliable application and infrastructure updates. AWS CodePipeline builds, tests, and deploys your code every time there is a code change, based on the release process models you define. This enables you to deliver features and updates rapidly and reliably. You can easily build an end-to-end solution with prebuilt plugins for popular third-party services like GitHub, or you can integrate your own custom plugins into any stage of your release process. With AWS CodePipeline, you pay only for what you use. There are no up-front fees or long-term commitments

What Is AWS CodePipeline?

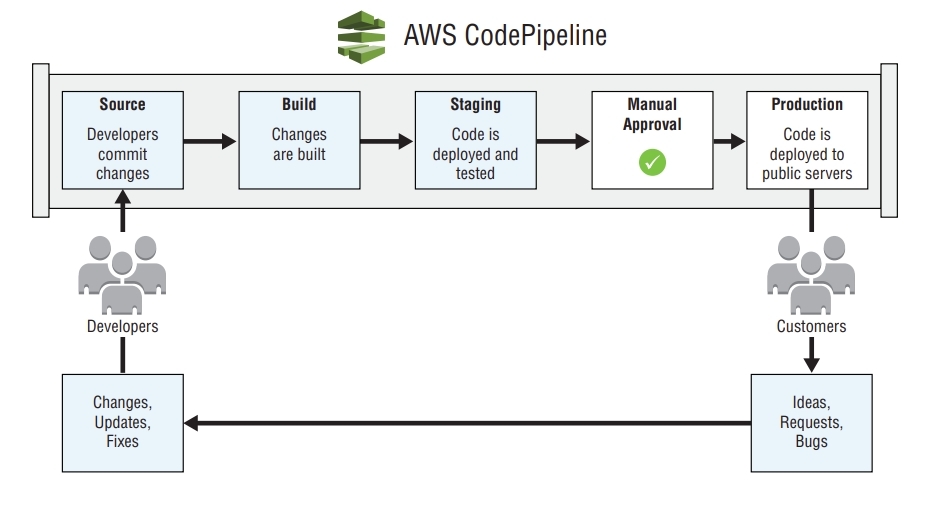
AWS CodePipeline is the underpinning of CI/CD processes in AWS. Because you define your delivery workflow as a set of stages and actions, multiple changes can be run simultaneously through the same set of processing steps every time. In the figure, the developer team is responsible for committing changes to a source repository. AWS CodePipeline automatically detects and moves into the source stage. The code change (revision) passes to the build stage, where changes are built into a package or product ready for deployment. A staging deployment is done where users can manually review the functionality that the changes introduce or modify. Before final production release, an authorized user provides a manual approval. After production release, further code changes can reliably pass through the same pipeline.

AWS CodePipeline workflow

CodePipeline

AWS CodePipeline provides a number of built-in integrations to other AWS services, such as AWS CloudFormation, AWS CodeBuild, AWS CodeCommit, AWS CodeDeploy, Amazon Elastic Container Service (ECS), Elastic Beanstalk, AWS Lambda, AWS OpsWorks Stacks, and Amazon Simple Storage Service (Amazon S3). Some partner tools include GitHub (https://github.com) and Jenkins (https://jenkins.io). Customers also have the ability to create their own integrations, which provides a great degree of flexibility. You define workflow steps through a visual editor within the AWS Management Console or via a JavaScript Object Notation (JSON) structure for use in the AWS CLI or AWS SDKs. Access to create and manage release workflows is controlled by AWS Identity and Access Management (IAM). You can grant users fine-grained permissions, controlling what actions they can perform and on which workflows. AWS CodePipeline provides a dashboard where you can review real-time progress of revisions, attempt to retry failed actions, and review version information about revisions that pass through the pipeline.

AWS CodePipeline Concepts

There are a number of different components that make up AWS CodePipeline and the workflows (pipelines) created by customers.

Pipeline structure

Pipeline

Pipeline

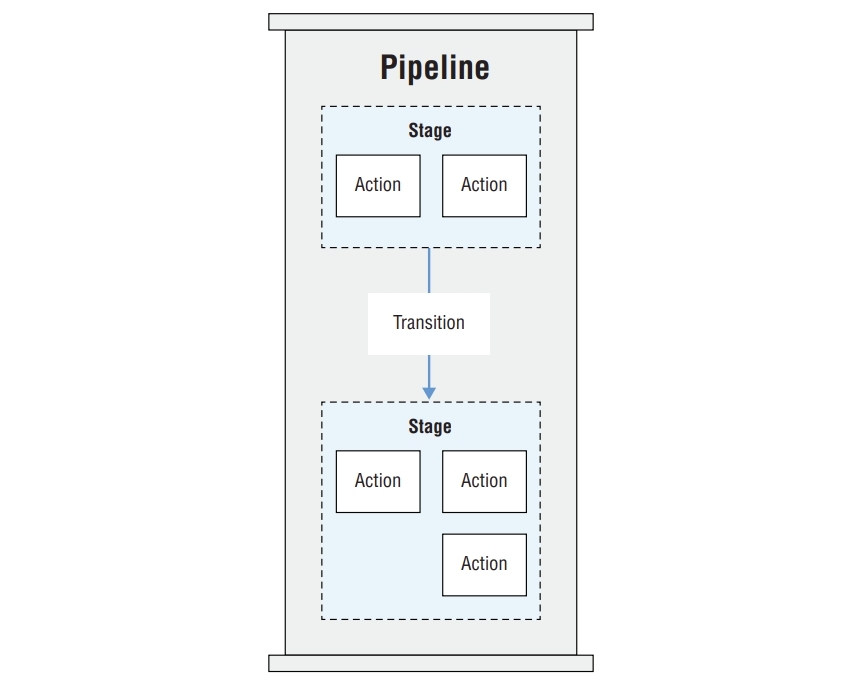
A pipeline is the overall workflow that defines what transformations software changes will undergo.

You cannot change the name of a pipeline. If you would like to change the name, you must create a new pipeline.

Revision

A revision is the work item that passes through a pipeline. It can be a change to your source code or data stored in AWS CodeCommit or GitHub or a change to the version of an archive in Amazon S3. A pipeline can have multiple revisions fl owing through it at the same time, but a single stage can process one revision at a time. A revision is immediately picked up by a source action when a change is detected in the source itself (such as a commit to an AWS CodeCommit repository).

If you use Amazon S3 as a source action, you must enable versioning on the bucket.

Details of the most recent revision to pass through a stage are kept within the stage itself and are accessible from the console or AWS CLI. To see the last revision that was passed through a source stage, for example, you can select the revision details at the bottom of the stage

Stage

Depending on the source type (Amazon S3, AWS CodeCommit, or GitHub), additional information will be accessible from the revision details pane (such as a link to the commit on https://github.com)

Revision details

Revision

Stage

A stage is a group of one or more actions. Each stage must have a unique name. Should any one action in a stage fail, the entire stage fails for this revision.

###Action An action defi nes the work to perform on the revision. You can confi gure pipeline actions to run in series or in parallel. If all actions in a stage complete successfully for a revision, it passes to the next stage in the pipeline. However, if one action fails in the stage, the revision will not pass further through the pipeline. At this point, the stage that contains the failed action can be retried for the same revision. Otherwise, a new revision is able to pass through the stage.

A pipeline must have two or more stages. The first stage includes one or more source actions only. Only the first stage may include source actions.

Every action in the same stage must have a unique name.

Source

The source action defi nes the location where you store and update source fi les. Modifi cations to fi les in a source repository or archive trigger deployments to a pipeline. AWS CodePipeline supports these sources for your pipeline:

  • Amazon S3
  • AWS CodeCommit
  • GitHub

A single pipeline can contain multiple source actions. If a change is detected in one of the sources, all source actions will be invoked.

To use GitHub as a source provider for AWS CodePipeline, you must authenticate to GitHub when you create a pipeline. You provide GitHub credentials to authorize AWS CodePipeline to connect to GitHub to list and view repositories accessible by the authenticating account. For this link, AWS recommends that you create a service account user so that the lifecycle of personal accounts is not tied to the link between AWS CodePipeline and GitHub.
After you authenticate GitHub, a link is created between AWS CodePipeline for this AWS region and GitHub. This allows IAM users to list repositories and branches accessible by the authenticated GitHub user.

Build

You use a build action to defi ne tasks such as compiling source code, running unit tests, and performing other tasks that produce output artifacts for later use in your pipeline. For example, you can use a build stage to import large assets that are not part of a source bundle into the artifact to deploy it to Amazon Elastic Compute Cloud (Amazon EC2) instances. AWS CodePipeline supports the integrations for the following build actions:

  • AWS CodeBuild
  • CloudBees
  • Jenkins
  • Solano CI
  • TeamCity

Test

You can use test actions to run various tests against source and compiled code, such as lint or syntax tests on source code, and unit tests on compiled, running applications. AWS CodePipeline supports the following test integrations:

  • AWS CodeBuild
  • BlazeMeter
  • Ghost Inspector
  • Hewlett Packard Enterprise (HPE) StormRunner Load
  • Nouvola
  • Runscope

Deploy

The deploy action is responsible for taking compiled or prepared assets and installing them on instances, on-premises servers, serverless functions, or deploying and updating infrastructure using AWS CloudFormation templates. The following services are supported as deploy actions:

  • AWS CloudFormation
  • AWS CodeDeploy
  • Amazon Elastic Container Service
  • AWS Elastic Beanstalk
  • OpsWorks Stacks
  • Xebia Labs

Approval

An approval action is a manual gate that controls whether a revision can proceed to the next stage in a pipeline. Further progress by a revision is halted until a manual approval by an IAM user or IAM role occurs.

Specifically, the codepipeline:PutApprovalResult action must be included in the IAM policy

Upon approval, AWS CodePipeline approves the revision to proceed to the next stage in the pipeline. However, if the revision is not approved (rejected or the approval expires), the change halts and will stop progress through the pipeline. The purpose of this action is to allow manual review of the code or other quality assurance tasks prior to moving further down the pipeline.

Approval actions cannot occur within source stages.

You must approve actions manually within seven days; otherwise, AWS CodePipeline rejects the code. When an approval action rejects, the outcome is equivalent to when the stage fails. You can retire the action, which initiates the approval process again. Approval actions provide several options that you can use to provide additional information about what you choose to approve.

Publish approval notifications Amazon Simple Notifi cation Service (Amazon SNS) sends notices to one or more targets that approval is pending.

Specify a Universal Resource Locator (URL) for review You can include a URL in the approval action notifi cation, for example, to review a website published to a fl eet of test instances.

Enter comments for approvers You can add additional comments in the notifi cations for the reviewer’s reference.

Invoke

You can customize the invoke action within AWS CodePipeline if you leverage the power and fl exibility of AWS Lambda. Invoke actions execute AWS Lambda functions, which allows arbitrary code to be run as part of the pipeline execution. Uses for custom actions in your pipeline can include the following:

  • Backing up data volumes, Amazon S3 buckets, or databases
  • Interacting with third-party products, such as posting messages to Slack channels
  • Running through test interactions with deployed web applications, such as executing a test transaction on a shopping site
  • Updating IAM Roles to allow permissions to newly created resources

When you deploy changes to multiple AWS Elastic Beanstalk environments, for example, you can use AWS Lambda to invoke a stage to swap the environment CNAMEs ( SwapEnvironmentCNAMEs ). This effectively implements blue/green deployments via AWS CodePipeline.

Artifact

Artifacts are actions that act on a fi le or set of fi les. Artifacts can pass between actions and stages in a pipeline to provide a fi nal result or version of the fi les. For example, an artifact that passes from a build action would deploy to Amazon EC2 during a deploy action.

Multiple actions in a single pipeline cannot output artifacts with the same name.

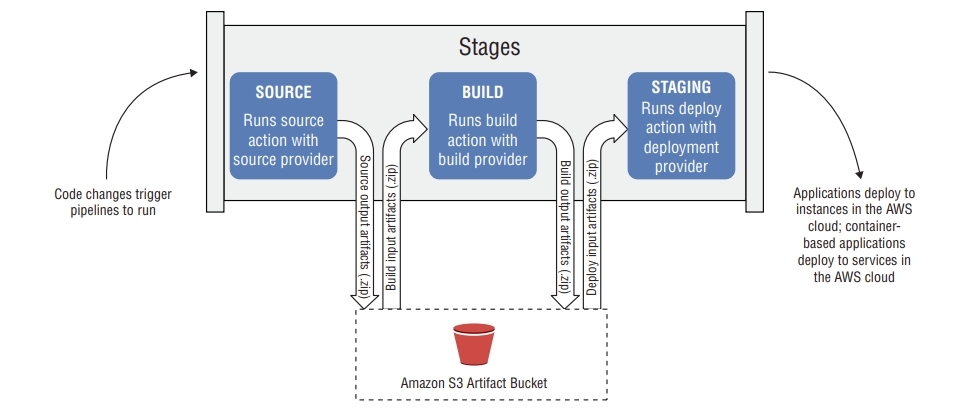
Every stage makes use of the Amazon S3 artifact bucket that you defi ne when you create the pipeline. Depending on the type of action(s) in the stage, AWS CodePipeline will package the output artifact. For example, the output artifact of a source action would be an archive ( .zip ) containing the repository contents, which would then act as the input artifact to a build action.

For an artifact to transition between stages successfully, you must provide unique input and output artifact names. In the figure, the output artifact name for the source action must match the input artifact for the corresponding build action.

Artifact transition

Transition

Transition

Transitions connect stages in a pipeline and define which stages should transition to one another. When all actions in a stage complete successfully, the revision passes to the next stage(s) in the pipeline. You can manually disable transitions, which stops all revisions in the pipeline once they complete the preceding stage (successfully or unsuccessfully). Once you enable the transition again, the most recent successful revision resumes. Other previous successful revisions will not resume through the pipeline at this time. This concept also applies to stages that are not yet available by the time the next revision completes. If more than one revision completes while the next stage is unavailable, they will be batched. This means that the most current revision will continue through the pipeline once the next stage becomes available.

Managing Approval Actions

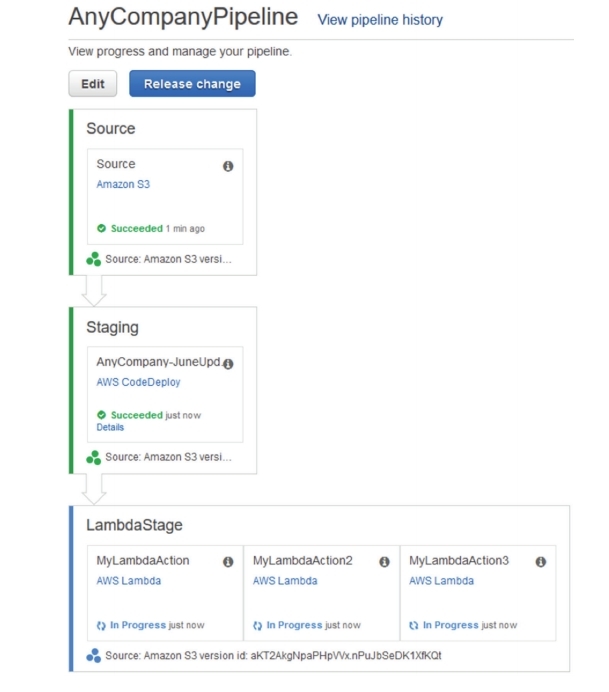
Approval actions halt further progress through a pipeline until an authorized IAM user or IAM rule approves the transition. You can use approvals to review changes manually before final release into production, or as a code review step. The figure shows a pipeline with three stages: Source, Staging, and LambdaStage. The Source stage contains a source action referencing an Amazon S3 bucket. The source action has already completed and passed the source artifact to Staging. In Staging, the deploy action deploys the source artifact to Amazon EC2 with AWS CodeDeploy. If this action completes successfully, the LambdaStage stage begins, which also deploys to Amazon EC2 via AWS CodeDeploy.

Full pipeline

Any Pipeline

AWS CodePipeline Service Limits

LimitValue
Pipelines per region US East (N. Virginia) ( us-east-1): 40
US West (Oregon) ( us-west-2): 60
EU (Ireland) ( eu-west-1): 60
Other supported regions: 20
Stages per pipelineMinimum: 2
Maximum: 10
Actions per stage Minimum: 1
Maximum: 20
Parallel actions per stageMaximum: 10
Sequential actions per stageMaximum: 10
Maximum artifact sizeAmazon S3 source: 2 GB
AWS CodeCommit source: 1 GB
GitHub source: 1 GB

When you deploy to AWS CloudFormation, the maximum artifact size is 256 MB.

AWS CodePipeline Tasks

The remainder of this section will focus on the tasks you need to build and execute a simple pipeline and how to outline the requirements to build cross-account pipelines. This concept is particularly important for organizations that have multiple AWS accounts, especially when you separate environments across accounts (such as Account A for development, Account B for Quality Assurance [QA], and Account C for production), as AWS CodePipeline will need access to resources in each account to automate deployments successfully.

Before you start the next steps, make sure that you have an IAM user with an access key and secret access key and that the user has sufficient AWS CodePipeline permissions.

Create an AWS CodePipeline

It is best to name your pipeline something meaningful, such as Dev_S3_Bucket. After you select a source provider (Amazon S3, AWS CodeCommit, or GitHub), you must enter a full object path. This corresponds to the .zip archive that will be tracked for changes. When you select Amazon S3, AWS CodePipeline creates an Amazon CloudWatch Events rule, IAM role, and AWS CloudTrail trail. These are the default methods that notify AWS CodePipeline of changes to the source archive. You can also use AWS CodePipeline to check regularly for changes. This, however, will provide a slower update experience. You select AWS CodeBuild, Jenkins, or Solano CI for a build provider.

The Jenkins build provider requires you to install the AWS CodePipeline plugin for Jenkins on the server. The Solano CI build provider requires authentication to GitHub with a valid user. After authenticating to GitHub, you must authenticate to Solano CI.

If you do not select a build provider, you must select a deployment provider (if you select a build provider, the deployment step is optional). This option is useful if you desire the pipeline execution to be a fi nished build artifact, such as the case with custom media transcoding with AWS CodeBuild. The available providers for the deployment stage are Amazon ECS, AWS CloudFormation, AWS CodeDeploy, AWS Elastic Beanstalk, and AWS OpsWorks Stacks. AWS Elastic Beanstalk allows customers to automate deployment of application archives to one or more Amazon EC2 instances. It also handles health checks, load balancing, log gathering, and other important tasks automatically. Since it requires a bundled application archive to upload to instances for deployment, it is a natural fi t for AWS CodePipeline, which provides artifacts as archives. To deploy to AWS Elastic Beanstalk from AWS CodePipeline, simply provide the application and environment name.

For deployment to AWS Elastic Beanstalk, the maximum application archive size is 512 MB. The deployment artifact must not exceed this size, or the deployment will fail.

You select a service role for AWS CodePipeline to access AWS resources within your account. You can select an existing IAM role or create a new role.

You can only select IAM roles with a trust policy that allows AWS CodePipeline to assume them.

Start a Pipeline

After you create a pipeline, the fi rst stage updates the source repository or archive, and then the pipeline will automatically begin execution. To rerun the pipeline for the most recent revision, select Release Change in the AWS CodePipeline console, or invoke the aws codepipeline start-pipeline-execution AWS CLI command.

aws codepipeline start-pipeline-execution --name SamplePipeline

Retry a Failed Action

If a pipeline action fails for any reason, you can retry that action on the same revision in the console or use the aws codepipeline retry-stage-execution AWS CLI command. However, there are certain situations where a failed action may become ineligible for retries.

  • The pipeline itself has changed after the action failed.
  • Other actions in the same stage have not completed.
  • The retry attempt is already in progress.

Create a Cross-Account Pipeline

In some architectures, environments may be spread across two or more AWS accounts. You can implement a single CI/CD workfl ow with AWS CodePipeline that interacts with resources in multiple AWS accounts.

If an organization has separate accounts for development, test, and production workloads, you can leverage one pipeline to deploy to resources in all three. To do so, you must create and shard several components between accounts.

A source action of Amazon S3 cannot reference buckets in accounts other than the pipeline account.

Pipeline Account Steps

In the following steps, the account that contains the pipeline will be the pipeline account. The account to deploy resources will be the target account.

  1. Create an AWS Key Management Service (AWS KMS) key in the pipeline account, and apply it to the pipeline. This key encrypts artifacts that pass between stages, and you configure it to allow access to the target account in a later step. After you create the AWS KMS key, you apply a key policy that allows access to the key by both the AWS CodePipeline service role in the pipeline account and the Amazon Resource Name (ARN) of the target account.
  2. Apply a bucket policy to the Amazon S3 bucket for the pipeline. This policy must grant access to the bucket by the target account.
  3. Create a policy that allows the pipeline account to assume a role in the target account. You attach this policy to the AWS CodePipeline service role.

Target Account Steps

If you deploy revisions to Amazon EC2 instances (as with AWS CodeDeploy), you apply a policy to the instance role that allows access to the Amazon S3 bucket that the AWS CodePipeline uses in the pipeline account. Additionally, the instance role must also have a policy that allows access to the AWS KMS key.

  1. Create an IAM role that contains a trust relationship policy that allows the pipeline account to assume the role.
  2. Create an IAM policy that allows access to deploy to the pipeline’s resources. Attach this policy to the IAM role.
  3. Create an IAM policy that allows access to the Amazon S3 bucket in the pipeline account, and attach it to the IAM role. After completing the previous steps, revisions that pass through the pipeline account will be accessible by the target account.