Skip to content
English
On this page

VPC

The VPC service provides us with the ability to provision logically isolated networks in AWS. With VPC, we are able to design, create, and manage all aspects of networking in the AWS Cloud. When creating a VPC, we start by creating a range of IPv4 and/or IPv6 addresses that we can then split into subnets. We also have the ability to configure all aspects of routing and control how and where we attach network gateways. The VPC is the main environment that provides logical network isolation and grouping of resources, such as Elastic Compute Cloud (EC2) or Elastic Container Service (ECS) instances, and other AWS services that we want to connect to via private IP ranges.

VPC Networks

When creating a VPC, we always specify a network range for the VPC. This range is limited to sizes between /28 and /16 according to the Classless Inter-Domain Routing (CIDR) definition of network addressing. Each VPC network can then be further subdivided into subnets. Addressing in VPC defaults to IPv4, but IPv6 and dual stacks can be run in a VPC if required. When running IPv6 or dual stacks, we need to be aware of the implications of the protocol and its effects on how traffic will pass through to the internet and back. When creating a network, we need to be aware of the approximate number of addresses we will be consuming in each VPC and each subnet. This is important as the provisioning process in VPC is irreversible – when we provision a network, we cannot change it. We should try and make sure that we have designed the VPC with ample space for our application to run and possibly grow with time.

We should also consider that there will be some services running in the VPC that are reserved by AWS; for example, an IP address will be consumed for the internet gateway (IGW), the DHCP service, the NAT gateway, and the reserved addresses that AWS keeps unused for future services.

Subnets

Each VPC requires further division into one or more subnets. A subnet provides logical separation and isolation of resources within the same VPC. For example, you may want to have web servers and application servers in the same VPC, but you want only the web servers to be accessible from the internet.

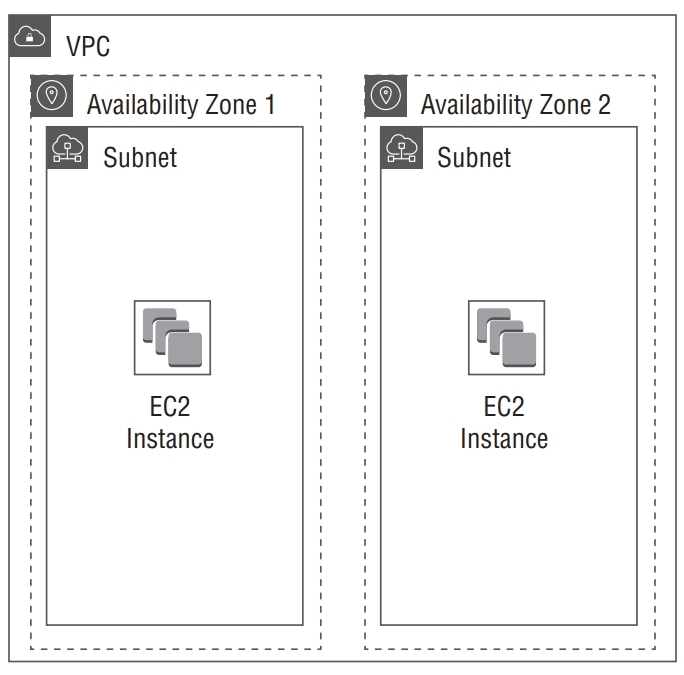
As with a VPC, you must defi ne a CIDR for each subnet. The subnet CIDR must be a subset of the VPC CIDR, with a size between /16 and /28. For example, if the default VPC CIDR is 172.31.0.0/16, then a subnet CIDR could be 172.31.16.0/20. Each subnet exists only within a single Availability Zone. Refer to Figure 10.1 for a sample VPC topology with two subnets.

A VPC with two subnets in different Availability Zones.

vpc

Private and public subnets

AWS defines two types of subnets that can be created within a VPC network – public and private. By design, the only difference that makes a subnet public rather than private is that instances running in a public network will be able to access the internet by default and also be made public by attaching a public or Elastic IPs to them. The public subnet would also be identified easily as it will have an IGW attached to it and a route for all addresses pointing to the IGW. We can think of a public subnet as a sort of DMZ in classical network terms. The subnet is hidden from public view via a router (the IGW) with 1:1 DNAT rules attached that map the public or Elastic IPs to the IPs of our instances running in the subnet. Private networks are completely cut off from any access to the internet by default, but can communicate with any instances running in all subnets that exist in the VPC. We can also control the traffic between all subnets through the VPC's network access control lists (NACLs) and define rules that will prevent certain subnets from communicating from each other. Private subnets are also able to connect to other networks via a NAT gateway that will allow outbound traffic, as well as through a VPN Gateway or Direct Connect connection that will allow the private subnets to communicate without on-premise systems.

This holds true for IPv4, but when we're using IPv6, there is no such concept as NAT due to the fact that all IPv6 addresses are global unicast addresses. This means that the only way to allow an IPv6 subnet to communicate with the internet is to attach an IGW to the subnet. All IPv6 addresses in a subnet with an IGW attached are inherently able to access the internet and instantly become accessible from the internet. But what if we want to keep our instances private and still communicate with the internet? For this purpose, AWS has introduced a so-called egress-only gateway that can be used to allow instances with IPv6 addresses to communicate with the internet, but does not allow any traffic into the subnet since ingress traffic is automatically blocked. This is an easy way of making an IPv6 subnet private.

Public, elastic, and private IPs

When we use IPv4 networks and have created some resources in a VPC subnet, we will need to make them available on the internet. As we've already mentioned, we can attach an IGW to the subnet and make it public. Once we have spun up some instances in the subnet, we can either attach a public IP address or an Elastic IP address.

Public IPs are sourced from one or more AWS-controlled public IP address pools and are attached to the instance randomly whenever an instance is started. When an instance using a public IP address fails and is recreated or shut down and restarted, it will not maintain the same public IP address.

This is probably the biggest advantage of Elastic IPs. An Elastic IP address is associated with your account and is persistent. This means that you have the ability to assign the Elastic IP to your instance to retain the address when it is shut down and restarted, or you can attach the same Elastic IP the failed instance was using to an instance that was recreated.

A public or Elastic IP attachment means that a virtual 1:1 DNAT connection between the public or Elastic IP is established with the instance's private IP. When the user inspects the IP address within the instance with operating system tools, they will not be seeing the public or Elastic IP. However, we do have an option to see the public or Elastic IP address from the instance itself by looking at the instance metadata. The instance metadata is available on an APIPA address of 169.254.169.254. We can see the contents of the metadata by browsing or issuing a command to inspect the address and retrieve information about our instance that would normally be invisible in the operating system. For example, when searching for the public IP, we can browse to the following URL: http://169.254.169.254/latest/meta-data/public-ipv4.

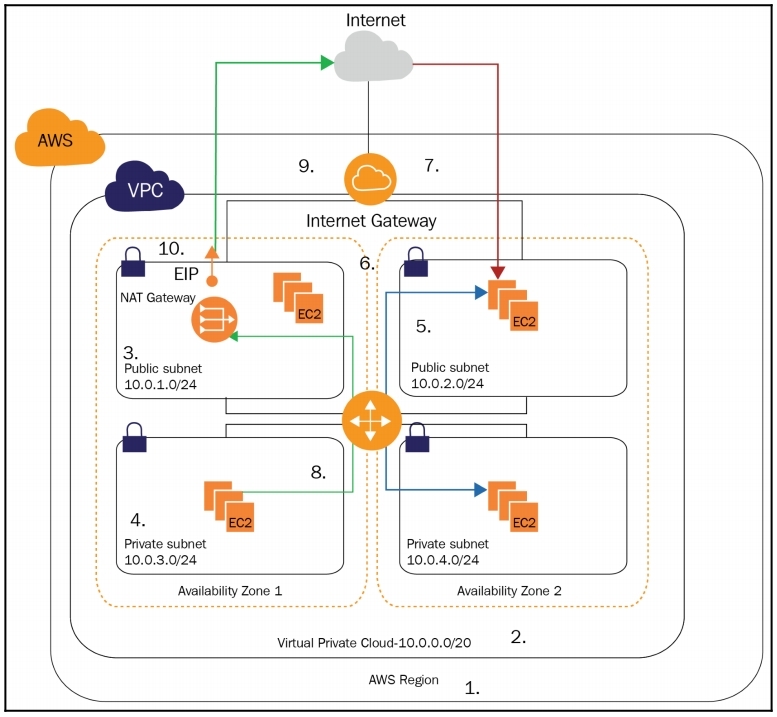
The following diagram represents a fully redundant VPC deployment with two private subnets and two public subnets. The following numbers correspond to what is labelled in the diagram:

  1. The VPC is deployed within an AWS region.
  2. The VPC network address range is designated as 10.0.0.0/20.
  3. Two public subnets are created with IP ranges 10.0.1.0/24 and 10.0.2.0/24.
  4. Two private subnets are created with IP ranges 10.0.3.0/24 and 10.0.4.0/24.
  5. All traffic between any subnets in the VPC is allowed by default as the local route points to the VPC address range of 10.0.0.0/20. Any additional subnets that are created in this network will also be accessible to all subnets.
  6. The public subnets have a connection to the internet gateway.
  7. Any EC2 instances with public or Elastic IPs assigned are accessible on the public subnet.
  8. Any private EC2 instances in the private subnet can reach the NAT gateway.
  9. The NAT gateway needs to be deployed in a public subnet and will NAT all the traffic from the EC2 instances in the public subnet in the outbound direction to the internet.
  10. The NAT gateway has an Elastic IP assigned, and any traffic being sent to the internet through the NAT gateway will always be seen as originating from this EIP:

vpc

Connecting private subnets to the internet

To connect an IPv4 private subnet to the internet, we can use a NAT gateway. The NAT gateway will allow all outgoing traffic to pass to the internet and is used when we require the instances in the private subnet to access the internet.

This allows us to access external services even from the private network, such as the following:

  • Retrieve operating system and application updates and patches.
  • Communicate with external services, such as payment gateways and processing tools.
  • Synchronize time with an external NTP service.
  • Access external DNS and other services.

A NAT gateway has the following features:

  • Supports 5 GBps of bandwidth and automatically scales up to 45 GBps.
  • Supports up to 55,000 simultaneous TCP, UDP, and ICMP connections to each unique destination.
  • Can associate exactly one Elastic IP address with a NAT gateway – once created, it cannot be dissociated.
  • Cannot associate a security group with a NAT gateway, but access can be controlled at the instance level with security groups.
  • A NAT gateway has an automatically assigned private IP in your subnet that can be viewed in the AWS management console.

If the performance of a single NAT instance is not satisfactory, we can create multiple NAT gateways.

In case we are using an IPv6 environment, we will need to use an egress-only internet gateway. The egress-only gateway has all the characteristics of an internet gateway, the only difference being that it blocks all incoming traffic to the IPv6 address space that we assign to our private subnet. We are thus able to achieve the same kind of operation as we would with an IPv4 NAT gateway without all the limitations that come with the NAT gateway.

There are also scenarios where the NAT gateway or the egress-only gateway are not the right solution. This would happen in cases where we require a single instance to handle greater volumes of IPv4 traffic or to retain control over the IPv4 or IPv6 traffic being passed to the internet. In certain situations, allowing all traffic to the internet via a NAT instance or egress-only gateway is not allowed or would not be compliant with certain rules. In this kind of scenario, we can spin up our own NAT instance with our own custom software running on it. We are also able to do additional traffic shaping and security checks with our own NAT instances, especially when they have some kind of packet inspection and firewalling software installed on it. To control IPv6 traffic, our instance will be using routing instead of NAT and control the flow of the traffic on the firewall level.

AWS Direct Connection

AWS Direct Connect makes it possible for a local network and Amazon VPC to create a dedicated link. You can setup a private connection between your data centre and AWS, office or colocation area with the AWS Direct Connect. This private link will minimize network costs, improve bandwidth throughput, and provide a network experience more reliable than other Internet connections.

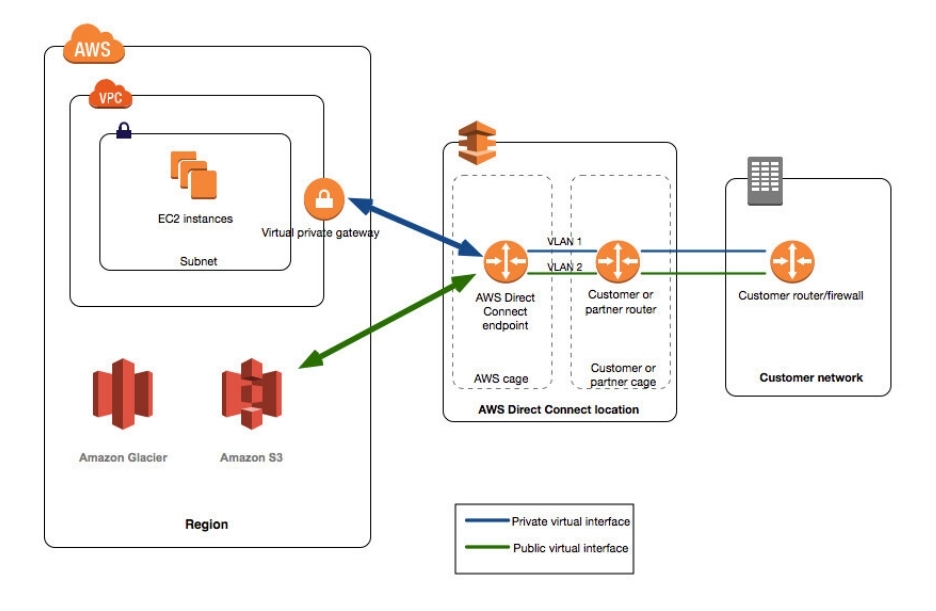
AWS Direct Connect allows you to establish dedicated 1 Gbps or 10 Gbps network connections (or multiple connections) between AWS networks and any of the AWS Direct Connect locations. It uses standard VLANs to access Amazon Elastic Compute Cloud (Amazon EC2) instances running on an Amazon VPC using private IP addresses. You can select from an ecosystem of WAN service providers to integrate your AWS Direct Connect endpoint into an AWS Direct Connect site with your external networks. The following figure illustrates this model. You can also work with your carrier to create a sub-1G connection or use a link aggregation group (LAG) to group multiple 1 gigabit or 10-gigabit connections together on a single AWS Direct Connect endpoint so you can handle them as one unified connection.

AWS Direct Connect + VPN

AWS Direct Connect + VPN allows you to combine one or more dedicated AWS Direct Connect network connections with Amazon VPC VPN. This combination provides an IPsec encrypted private connection that also lower network costs, increases bandwidth throughput, and provides a more consistent network experience than Internet-based VPN connections.

This option is illustrated by the below image

direct_connect

There are certain situations where we require services in private subnets with no access to the internet to be able to connect to an AWS service such as S3, SQS, KMS, and DynamoDB. We could also put instances in a public subnet, but with a requirement that no data within the application is passed over the public IP space. In both of these cases, we can implement a VPC endpoint to connect a service to the VPC and allow for communication to the service within a private IP space. VPC endpoint connections come in two different types:

  • Gateway endpoints
  • Interface endpoints

Gateway endpoint

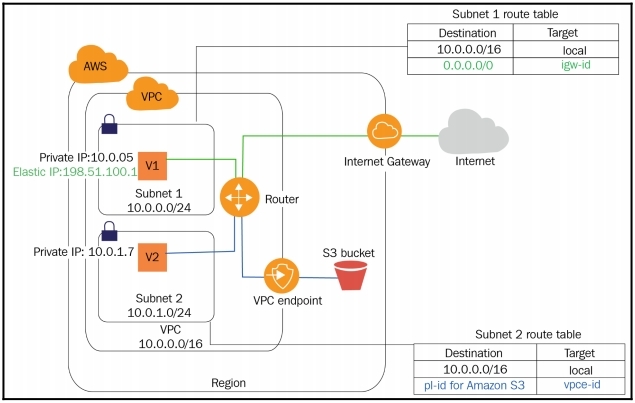
A gateway endpoint is generated for a specific AWS-supported service and is designed as a route within the VPC routing table. Any instance running within the VPC will need to consult the routing table to access the AWS service. At the time of writing, Amazon S3 and DynamoDB support gateway endpoints and will probably remain the only services to be supported in this way.

The following diagram shows an S3 VPC gateway endpoint that's connected to the VPC. The private subnet will now see an identifier for the S3 service and a route to the VPC endpoint device. This allows our EC2 instances in the private subnet to connect to the S3 service without requiring a NAT instance:

vpc

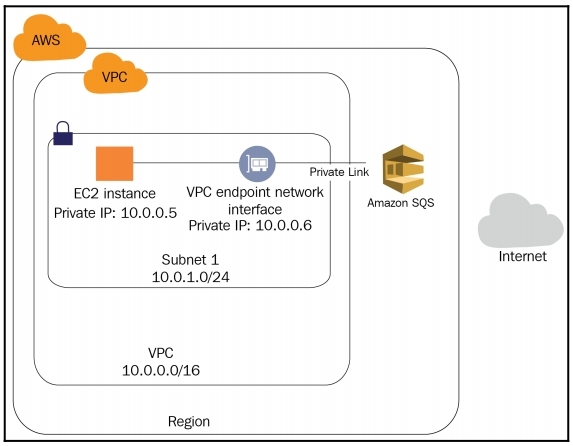
An interface endpoint is essentially a service-level ENI. The service is attached straight to the VPC subnet through the ENI. This allows us to assign a private IP address from the subnet pool directly to the service. By using an interface endpoint, we have the ability to address the AWS service directly through the private IP of the ENI instead of going to its public endpoint. This allows us to communicate with the service on the private network and maintain any data to the service within our subnet. Basically, it is like having a complete copy of an AWS service sitting right in your VPC subnet.

The following diagram shows an SQS VPC interface endpoint connected to the VPC. Our EC2 instances in the private subnet will now be able to directly connect to the SQS service by connecting to the private IP of the SQS service. Any SQS queues we create will be assigned a DNS name, and any DNS name within the private subnet with a VPC interface endpoint link will automatically resolve to the private IP of the VPC endpoint network interface:

vpc

To get a full list of services where the service endpoint is supported. please consult the VPC endpoints link in the Further reading section of this chapter. This service is supported by AWS PrivateLink. PrivateLink also allows any other service and software providers to provide a private interface link straight to your VPC subnet. This way, we can exchange information with the provider via a seamless private connection, keeping our traffic off the public networks.

VPC peering

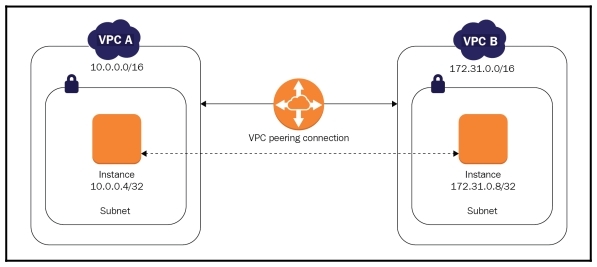
When operating a large application that spreads across VPCs or regions, we sometimes have a requirement to connect that application via a private connection. We always have the option to create VPN connections between VPCs, but that will require us to maintain the configuration of the VPN devices and ensure the security of those. A simpler way to connect VPCs together is through VPC peering. A VPC peering connection is a networking connection between two VPCs that allows you to route traffic between them privately and have the ability to connect instances in private subnets within separate VPCs to communicate directly, as demonstrated in the following diagram:

vpc

AWS provides the ability to create VPC peering connections between our own VPCs or with a VPC in another AWS account. The VPC peering connections can be established within one region or across different AWS regions. AWS uses existing, scalable network technologies with no single point of failure to enable VPC peering. When enabling VPC peering between regions, AWS will take care of the VPN connection between the locations and maintain redundant pathways for the traffic. Since the traffic between regions will pass over the internet, standard inter-region charges apply when using VPC peering between regions. No charges to traffic within a region are applied.

VPC CIDR Blocks

Each VPC requires a Classless Inter-Domain Routing (CIDR) block to define the range of IP version 4 (IPv4) addresses that resources within the VPC can use. Default VPCs have a CIDR of 172.31.0.0/16, which includes all addresses from 172.31.0.0 to 172.31.255.255. The /16 refers to the size of the CIDR. You must choose a CIDR size between /16 and /28, but otherwise, any CIDR you could assign to a traditional network can also be assigned to a VPC. The smaller the CIDR size, the greater the number of IP addresses available to the VPC. The following are a few examples of CIDR blocks that you could assign to a VPC:

  • 10.0.0.0/16 (10.0.0.0–10.0.255.255)
  • 192.168.0.0/24 (192.168.0.0–192.168.0.255)
  • 172.16.0.0/28 (172.16.0.0–172.16.0.15)

At your request, AWS can also assign an IPv6 CIDR block to your VPC. The IPv6 CIDR will be a global unicast IPv6 address with a size of /56.

The acronym CIDR is usually pronounced “cider” for brevity.

Limitations of VPC peering

When setting up a VPC peering connection, we need to be aware of the following limitations:

  • It is not possible to peer VPC with overlapping IPv4 or IPv6 CIDR blocks.
  • Transitive peering is not supported; for example, peering A to B and B to C does not establish a link between A and C.
  • Networking with the Virtual Private Cloud Chapter 2 Unicast reverse path forwarding in VPC peering connections is not supported.
  • Tagging a VPC peering connection is only applied in the account or region in which you create them.

Additionally, inter-region VPC peering connections have the following limitations:

  • The peer VPC's security groups cannot be referenced in security groups that are created in the other VPC.
  • DNS resolution of hostnames that have both public and private IPs will only resolve public IPs when queried from the peered VPC.
  • Communication over IPv6 is not supported.
  • Communication over ClassicLink for EC2-Classic instances is not supported.
  • Jumbo frames are not supported across the inter-region VPC peering connection.

Best practices

Now, let's take a look at the best practices that we should adhere to when designing a VPC. Generally, we should make sure that we follow these principles:

  • Design our networks and subnets in the appropriate sizes.
  • Design our networks with high availability requirements in mind.
  • Understand special requirements for routing.
  • Understand the limitations of VPC peering when required.
  • Understand general VPC limits.

Network and VPC sizing

When designing a VPC, we first need to look into network address configuration. Make sure that you design the network and subnet addressing with enough space to comfortably accommodate both the existing size and any future requirements for your application. The general rule when designing a VPC network and subnet ranges is that bigger is better. Don't lock yourself into small little subnets that will not allow your application to grow. Remember: once you create a VPC network, it cannot be changed. In case you require a larger network for your instances, you will need to create a new VPC and move the instances to the new VPC subnets.

High availability

When designing high availability, there are further considerations that you need to take into account. If public access is required, we would start by creating at least two public subnets in two different availability zones. This will allow us to spin up instances in two fault-isolated environments. The same approach would be used for private subnets – we would create at least two private subnets within two different availability zones. With private subnets, the high availability of your NAT gateway, NAT instance, or egress-only gateways should also be considered.

Routing

When parts of an application have unique routing requirements, add additional subnets and perform the routing at the subnet level. Put the parts of the application into separate subnets. The application will be able to inherently communicate since all subnets can communicate with each other by default. Each subnet will have the ability to provide specific routing to the part of the application that requires it.

VPC peering recommendations

When you require VPC peering, always consider the IP addressing of the existing VPCs so that you don't create an environment with overlapping IPs – VPC peering connections will not support overlapping IP ranges. Make sure that you always keep a design in mind that will allow you to grow. A good approach is to build sequential network ranges, for example, 10.0.0.0/16, 10.1.0.0/16, and 10.2.0.0/16 for the VPC networks, and then divide those networks into subnets, for example, 10.0.1.0/24, 10.0.2.0/24, 10.1.1.0/24, and 10.1.2.0/24. None of these ranges will ever overlap.

VPC limitations

Consider the limitations of VPCs. By default, you are allowed to create 5 VPCs per region. This number can be increased by contacting AWS support. However, you are limited to 200 subnets per VPC, so when you're designing subnets, there is no need to leave room for more than 200 subnets in your VPC network range. The 200 subnet limit is a hard limit. You can also create up to 5 IPv4 network ranges (one primary and four secondary) per VPC. This limit can be increased if needed. For IPv6 ranges, you are only allowed to create one IPv6 range per VPC. This is a hard limit and cannot be increased.

Further reading

Refer to the following links for more information regarding what has been covered in this chapter: